This fight doesn’t feel tough, it feels honestly less punishing then Barbaricca EX, HOWEVER – the struggle comes in that this time around the community is behaving slightly different? Generally it seems like the JP community will pick one strategy for Duty/Raid Finder and stick with it, so you are pretty easily able to figure it out after running it a few times to see what they are wanting to happen using Duty Finder.
This time however… It seems there are two common strategies being used. The one I give information on in here seems to be referred to as “Game 8” strategy. (The other – I don’t have any sort of handle on — is called “FFO” – so I’ve started avoiding those parties when I get the choice in Party Finder because my translation abilities aren’t good enough yet to figure out what and why things are different, but something really is and things go bad fast.
So – Here are my notes on what I’ve figured out from the “Game 8” version
- Inferno = Raid wide AoE
- Ordeal of Purgation – circles puzzle
- Option: Blue Triangle = Cone Attack
- Option: Orange Box = Half Arena Cleve
- Puzzle #1 – Both Markers – 1 line = adjust for activated marker
- Puzzle #2 – Orange Markers – 2 lines = Safe Spot below bottom of “V” shape in center
- Shattering Heat = Tank Buster
- Arch Inferno = Clockwise Rotating Circle AoEs (split into two light parties North & South to handle two of the following)
- Option: Spike of Flame (Orange marker) = spread to not overlap
- Option: Twinfold Flames (Blue Circles) = spread 2 – Blue 2 player stack groups
- Option: Fourfold Flames (Yellow Stack Marker) = Light party stack
- Conflagration = Line attack down center of arena (dodge this & rotating AoE’s)
- Arch Inferno = Clockwise Rotating Circle AoEs ((split into two light parties North & South to handle two of the following)
- Option: Spike of Flame (Orange marker) = spread to not overlap
- Option: Twinfold Flames (Blue Circles) = spread 2 – Blue 2 player stack groups
- Option: Fourfold Flames (Yellow Stack Marker) = Light party stack
- —MOVE TO CLOCK POSITION—
- Radial Flagration = Conal attacks towards each player
- Inferno = Raid wide AoE
- Ordeal of Purgation – circles puzzle
- Option: Blue Triangle = Cone Attack
- Option: Orange Box = Half Arena Cleve
- Puzzle #3 – 2 Blue Triangle Cone Attacks –
- Puzzle #4 – 2 Orange Cleave Attacks
- —ADDS – Boss Gauge (suggested order)—
- Main Tank NW “Flamesent” – take teathers / Sub(Off) Tank NE – “Flamesent” – take teathers
- Focus #1 “Greater Flamesent” (center mob – debuff AoE’s)
- Focus #2 “Flamesent” (centeral north – multiple AoE circles)
- Take out the rest before the Gauge reaches 100!
- Main Tank NW “Flamesent” – take teathers / Sub(Off) Tank NE – “Flamesent” – take teathers
- Blazing Rapture = mitigate damage & heal up
- —MOVE TO PARTNERED CARDINAL CLOCK POSITION —
- Flamespire Brand = 1 to 2 Debuffs applied to each player (Game 8 version) to be handled after “Flame Rake” Resolves
- Red Circle = Run to center
- Flare Marker + Red Circle = Run to outer safe spot then step slightly forward once danger resolves
- Red Circle + Share Marker = Run to center to share, then slightly step out to spread
- Flame Rake = Spinner will end on Cardinal OR Intercardinal. Where lands is where first cross attack will happen
- 1st Cross hit = Partnered grouping will dodge attack (clock-wise)
- 2nd Mid section hit = Partners split accordingly to deal with their Flamespire brand markers.
- 3rd Outer section hit = dodge accordingly near to
- —MOVE TO CLOCK POSITION—
- Inferno (+) = Cyclone Around each Player + Bleed (Heal as needed)
- Scalding (see below) – stay inline with your clock position
- Signal = be outside of hitbox in clock position
- Ring = be inside of hitbox in clock position
- Sweeping Immolation = wing flower option spawn + half room cleave (move behind be ready for stack or spread
- Single Flower = Gather together for a stack
- 4 Flowers = 2 players spread per safe side slice
- Dual Fire = Wide Tank Buster Cleaves (rest of party Move away!!)
- Ordeal of Purgation – circles puzzle
- Option: Blue Triangle = Cone Attack
- Option: Orange Box = Half Arena Cleve
- Puzzle #5 – Both Markers Available for selection – Adjust for single marker attack
- Puzzle #6 – Both Markers Types Selected – Adjust for both activated marker attacks
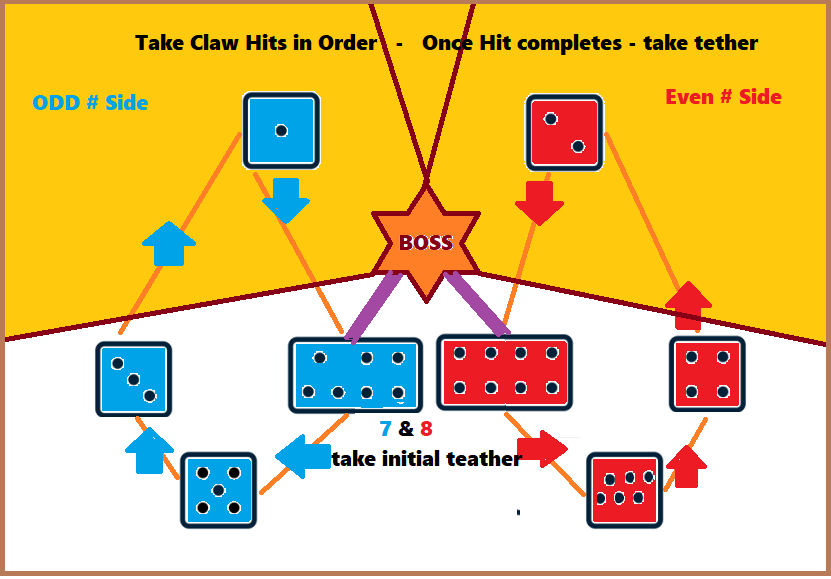
- Flamespire Claw = dice 1-8, cleaved in order (can only be hit by one – move into position in order)
- Dice Processing: Odd Numbers NW (blue) / Even Numbers NE (red)
- Initial Tether Positioning (Behind boss): #7 SW / # 8 SE
- Tether Passing Order: 7 > 1 > 3 > 5 & 8 > 2 > 4 > 6 (don’t let player reach 5 stacks)
- —MOVE TO CLOCK POSITION—
- Inferno (+) = Cyclone Around each Player + Bleed (Heal as needed)
- Scalding (see below) – stay inline with your clock position
- Signal = be outside of hitbox in clock position
- Ring = be inside of hitbox in clock position
- —MOVE BEHIND BOSS—
- Sweeping Immolation = wing flower option spawn + half room cleave (move behind be ready for stack or spread
- Single Flower = Gather together for a stack
- 4 Flowers = 2 players spread per safe side slice
- Dual Fire = Wide Tank Buster Cleaves (rest of party Move away!!)
- Ordeal of Purgation – circles puzzle starts over until ENRAGE
Macro "Game 8" Strategy

/p 【基本散開】      【烈風火燕流】
/p D3 MT D4  MT組(北):MTD1D3H1
/p H1  ★  H2   ST組(南): STD2D4H2
/p D1 ST  D2 ペア処理=近接組と遠隔組 AOE=DPSが進行方向の先で捨て
/p 【雑魚線取り】
/p MT→西 ST→東
/p 【炎禍の呪い】→ → →【赤滅熱波:散開】
/p   MT/D3       ↑ ↑ ★ ↑ ↑
/p H1/D1 ★ H2/D4   MT D1 D2 ST
/p     ST/D2         H1 D3 D4 H2
/p ※フレア時計回り捨て ※↑ボスの向き基準、頭割りD1D3ライン
/p 【サイコロ】
/p 奇数(北西) 偶数(北東)
/p 開幕7/8が線持ち 扇範囲を受けたら線持ち交代

--------------------------------------------
English Paraphrase

/p 【Basic Spread】    【Light Party】
/p D3  MT D4     North Group:MTD1D3H1
/p H1  ★   H2    South Group: STD2D4H2
/p D1  ST D2
/p 【Add Processing】
/p  MT→West  ST→East
/p 【partnered groups】→ → →【Sweeping Immolation 4 flowers】
/p   MT/D3       ↑ ↑ ★ ↑ ↑
/p H1/D1 ★ H2/D4   MT D1 D2 ST
/p    ST/D2      H1 D3  D4  H2
/p ※↑Flare discard clockwise ※↑Boss Direction Relevent
/p 【Dice】
/p Odd (NW) Even (NE)
/p Tether Lead = 7/8. (5 stack max - once your claw is processed, go take tether)
Helpful Images